How to “flash” a PIC microcontroller?
April 12, 2019 • tutorial
Many interesting online electronics projects make use of microcontrollers, and for the beginner this tends to be a pretty intimidating word. At least it was for me when I started with hobby electronics many years ago. But there is really no reason you should be afraid of this topic. It is a bit involved, sure, but you will be amazed how fast you can make progress when you shake off that initial fear :)
Okay, so let's say you have found a cool electronics project that you want to build yourself. On some website of some tinkerer who was kind enough to include the schematic and all other details you need. But the problem is: the project contains a microcontroller! What can you do?
Can you still build a project with a microcontroller, even if you don't know anything about them? The answer is yes! Yes, you can! In this article I will focus on PIC microcontrollers by the company MicroChip, but the general idea works for all others as well. Let me know in the comments if you have any questions or if anything wasn't clear :)
Step 1: Obtain the .hex file!
Microcontrollers are little computers, and they need a program to tell them what to do. It is a set of instructions, and that set of instructions needs to be transferred onto the controller to make it work. Usually this set of instructions is written in a programming language like C, Basic, Assembler, or whatever else. The good thing is: you don't need to know any of this if all you want to do is transfer that program onto the controller!
All you need is the so-called .hex file. This is a file, only a few kilobytes large, which is unreadable to the human eye. It contains machine code written in hexadecimal, which is where the name comes from. This file is all that you need, and if you look closely on an electronics blog where somebody presents their project that includes a microcontroller, there will be a .hex file for download somewhere. If it isn't, just ask! ??
Step 2: Get a programming device
Okay, so now you have the .hex file. Next you need a programmer. What is that? It is a device, usually powered off of USB, that connects your computer to the microcontroller. Using a special software (see step 4 below), you will be able to transfer the .hex file into the microcontroller's memory. Then, when the controller powers on, it will do whatever the .hex file tells it to do!
I suggest using the PICkit3. A simple Amazon search will show you many offers, usually around $30. I have used it for many years and it works great for programming PICs.
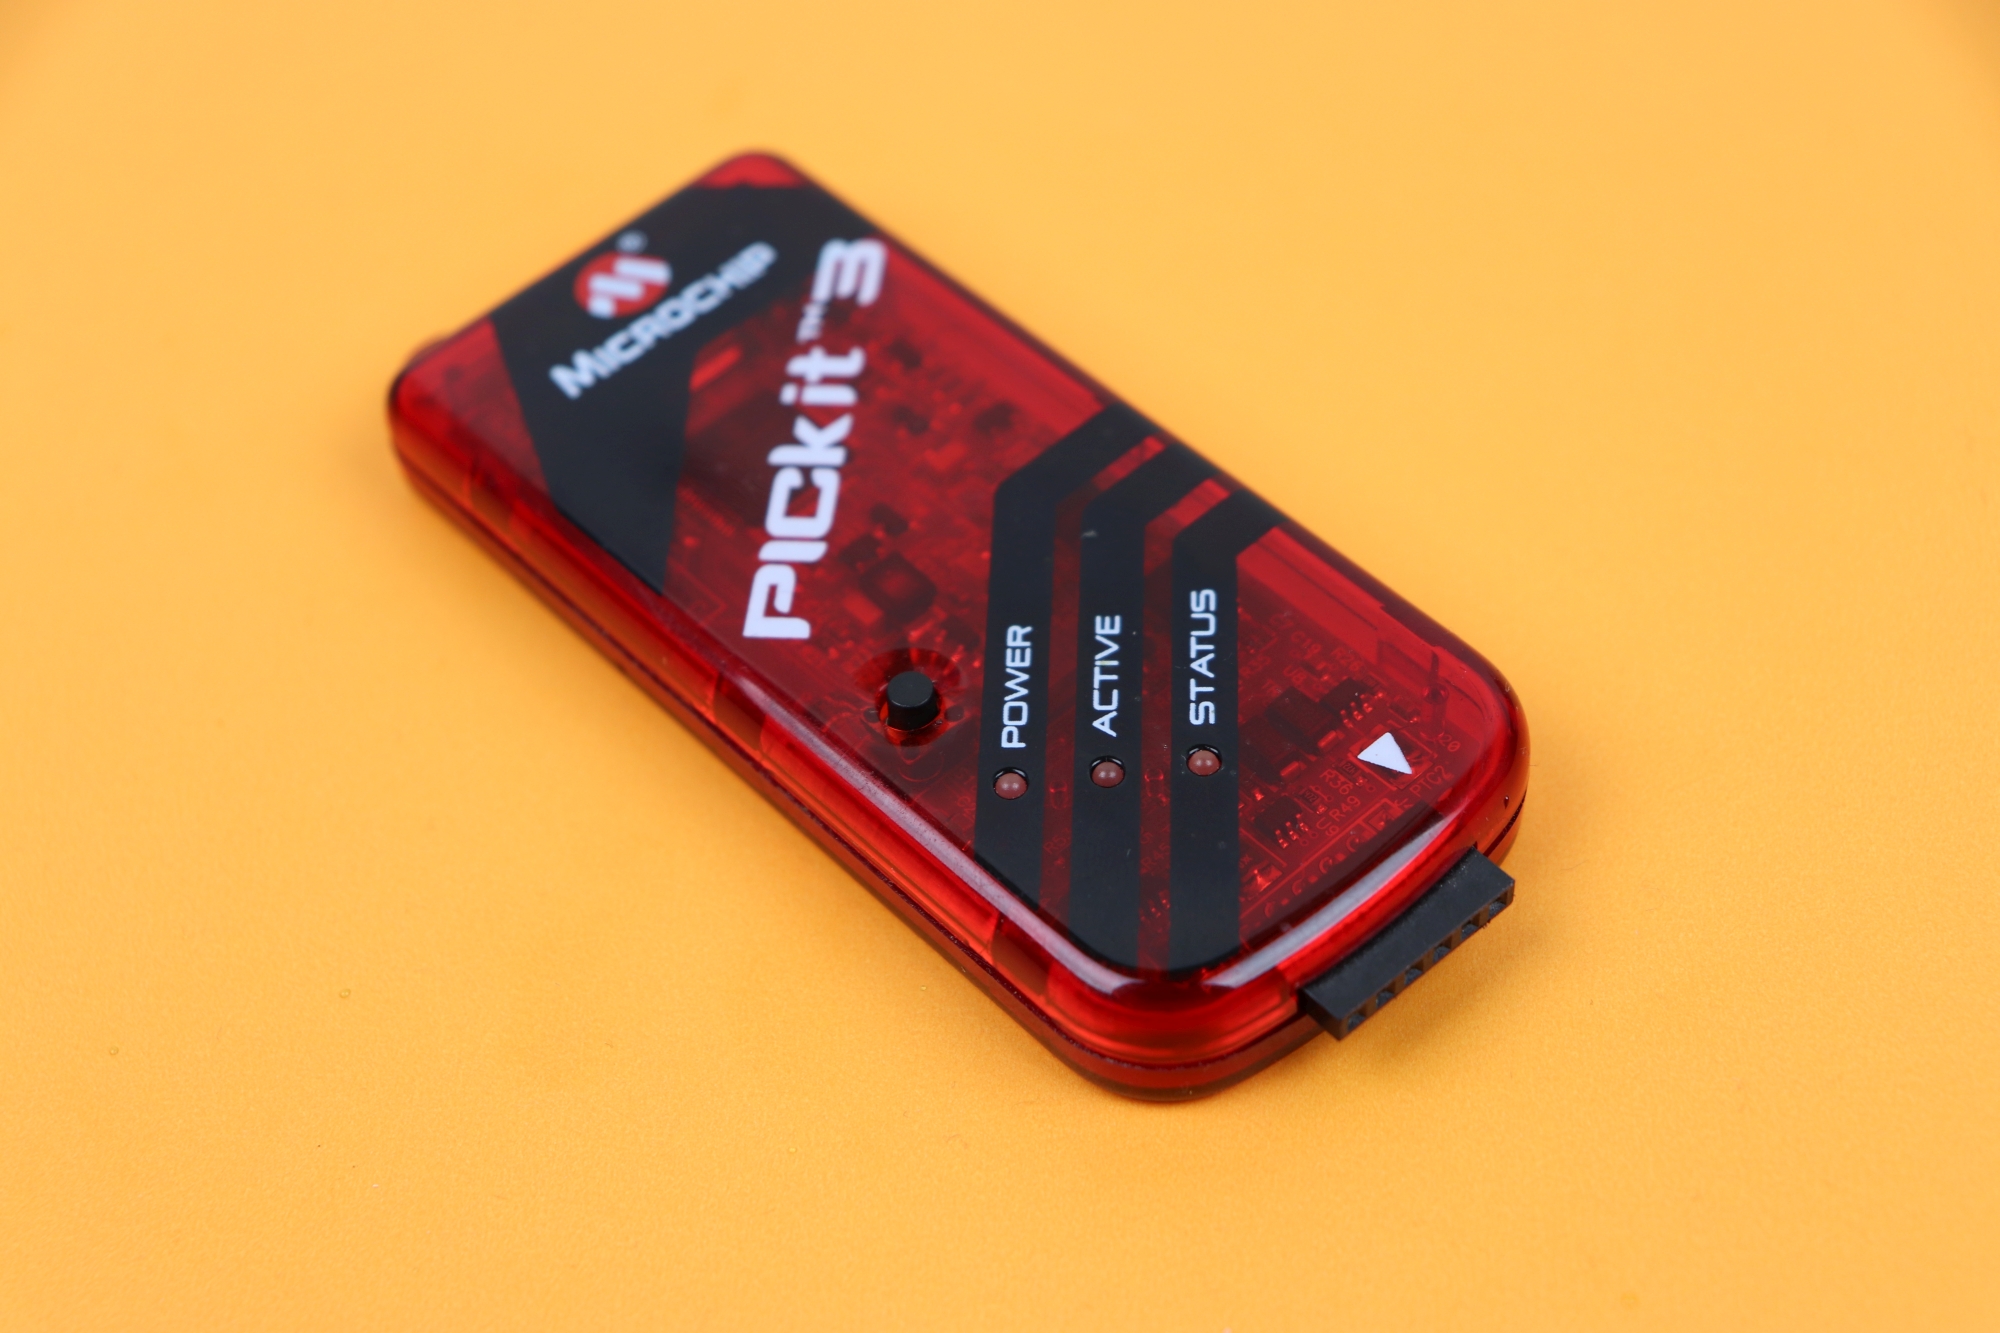 This is my PICkit3 that I bought many years ago, and it still works. Worth the money!
Oh, I almost forgot to mention: transferring the .hex file onto the controller is most of the times referred to as “programming” a PIC or “flashing” a PIC. Just so you know :)
Step 3: Connect the PIC controller to the programmer
OK, now you have your PIC controller, you have your PICkit3, and now what? Now you have to connect the PIC to the PICkit3, of course! ;-) But how?
There are five connections you need to know about, and we will talk about them one by one. First, have a look at this picture of my PICkit3:
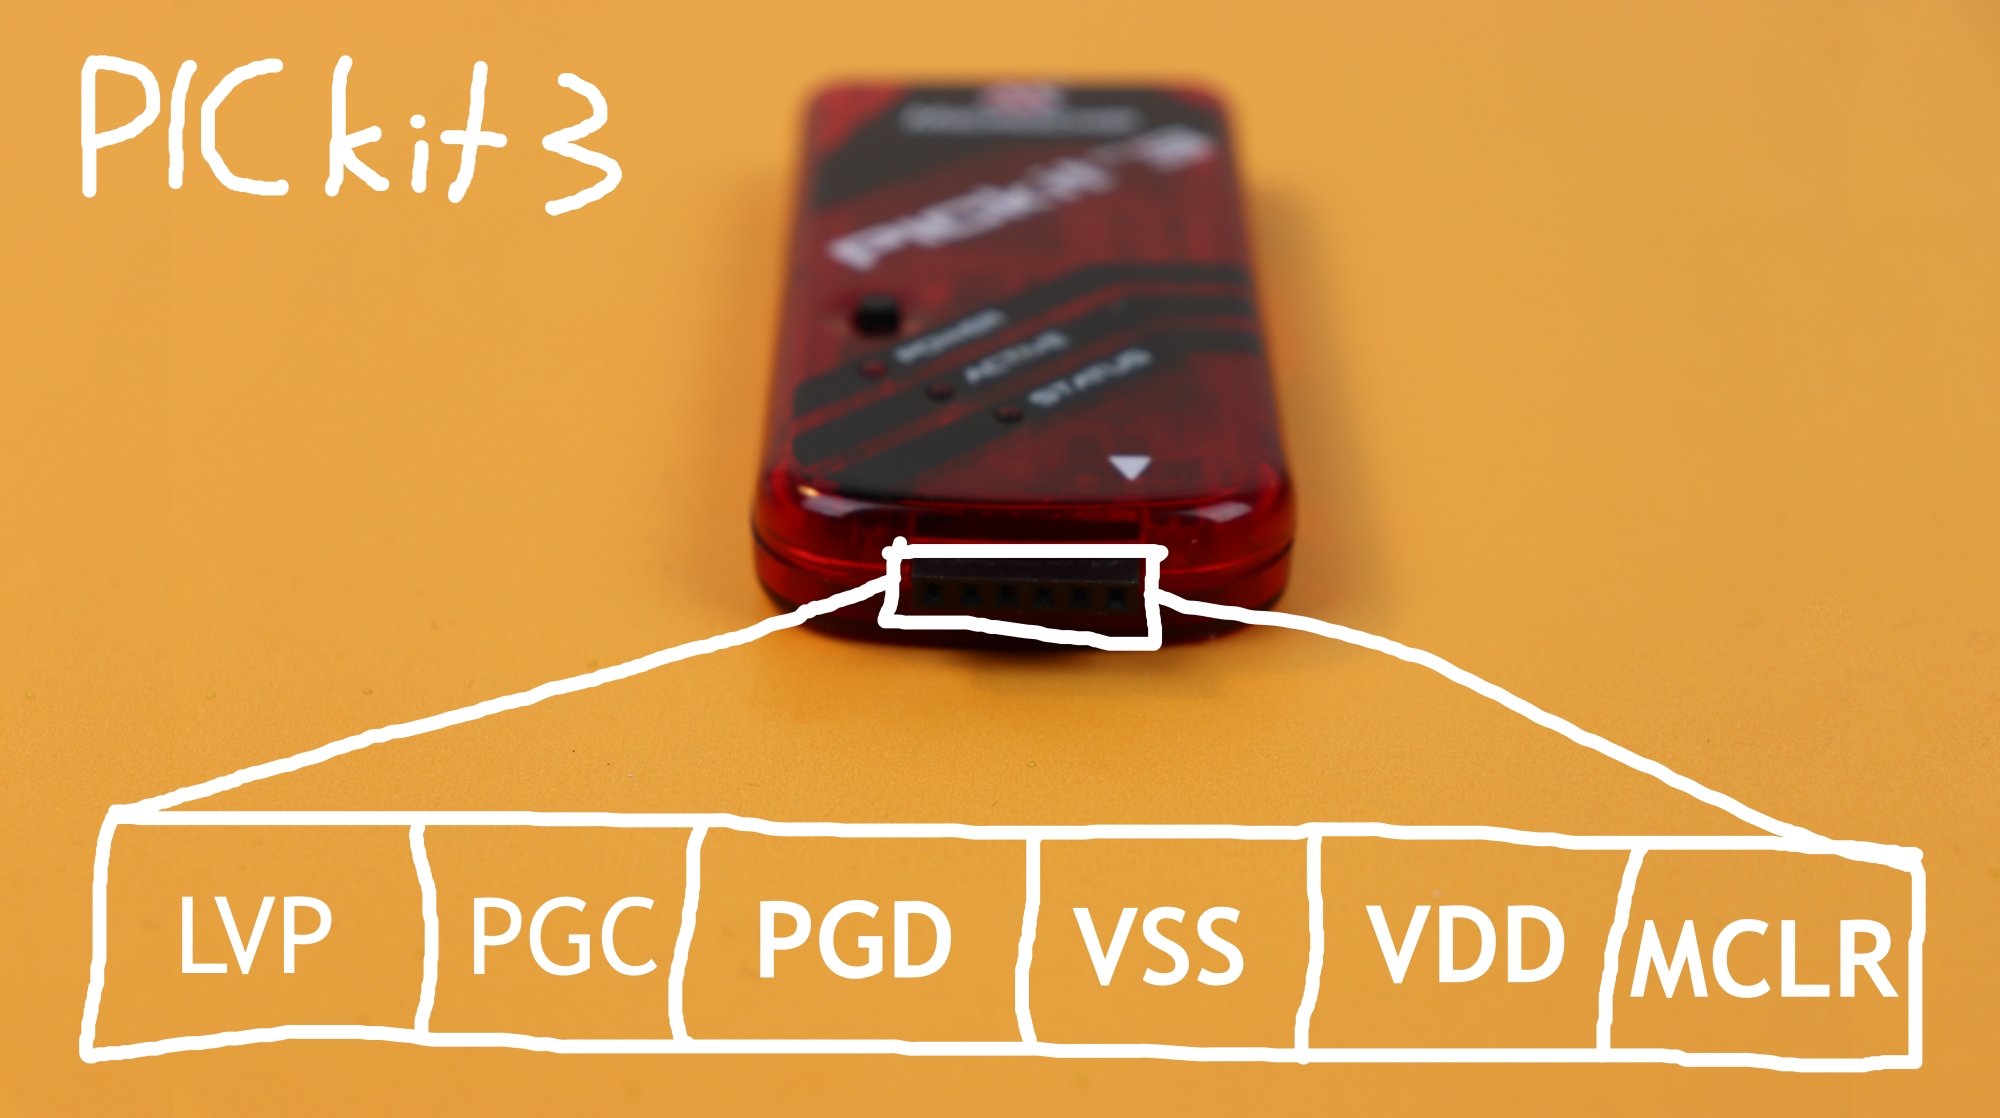 The six connections in the PICkit3.
There are six connections in a pin header at the PICkit3 called LVP, PGC, PGD, VSS, VDD, and MCLR. We will not be using LVP so let us ignore it in this article. So what do the five others stand for? Let us start with the two easy ones:
- VDD is the positive operating voltage.
- VSS is the ground potential.
And the others?
- MCLR stands for Master Clear, and grounding this pin puts the PIC controller into programming mode. During normal operation it has to be connected to VDD so that the PIC controller does not reset.
- PGD stands for Programming Data, and this is where the bits that are written into the controller during programming are transferred, much like in a shift register. It is the data line, and it can be high or low, depending on whether the PICkit3 is transferrring a high or low bit at that time.
- PGC, finally, is the Programming Clock. Whenever there is a pulse on this line the current bit at PGD gets written into the PIC and internally the PIC moves to the next slot to write the next bit. It is the heartbeat of the programming cycle.
And the best thing: this is nice information, but we don't need to know this! All we have to do is stick the PIC to a breadboard, add a pin-header, and connect the pins accordingly. Look up the datasheet of your PIC controller, where these pin names (MCLR, VDD, VSS, PGD, PGC) are clearly labelled. Then, use jumper wires to connect the PIC pins to the corresponding pin header, as you can see here:
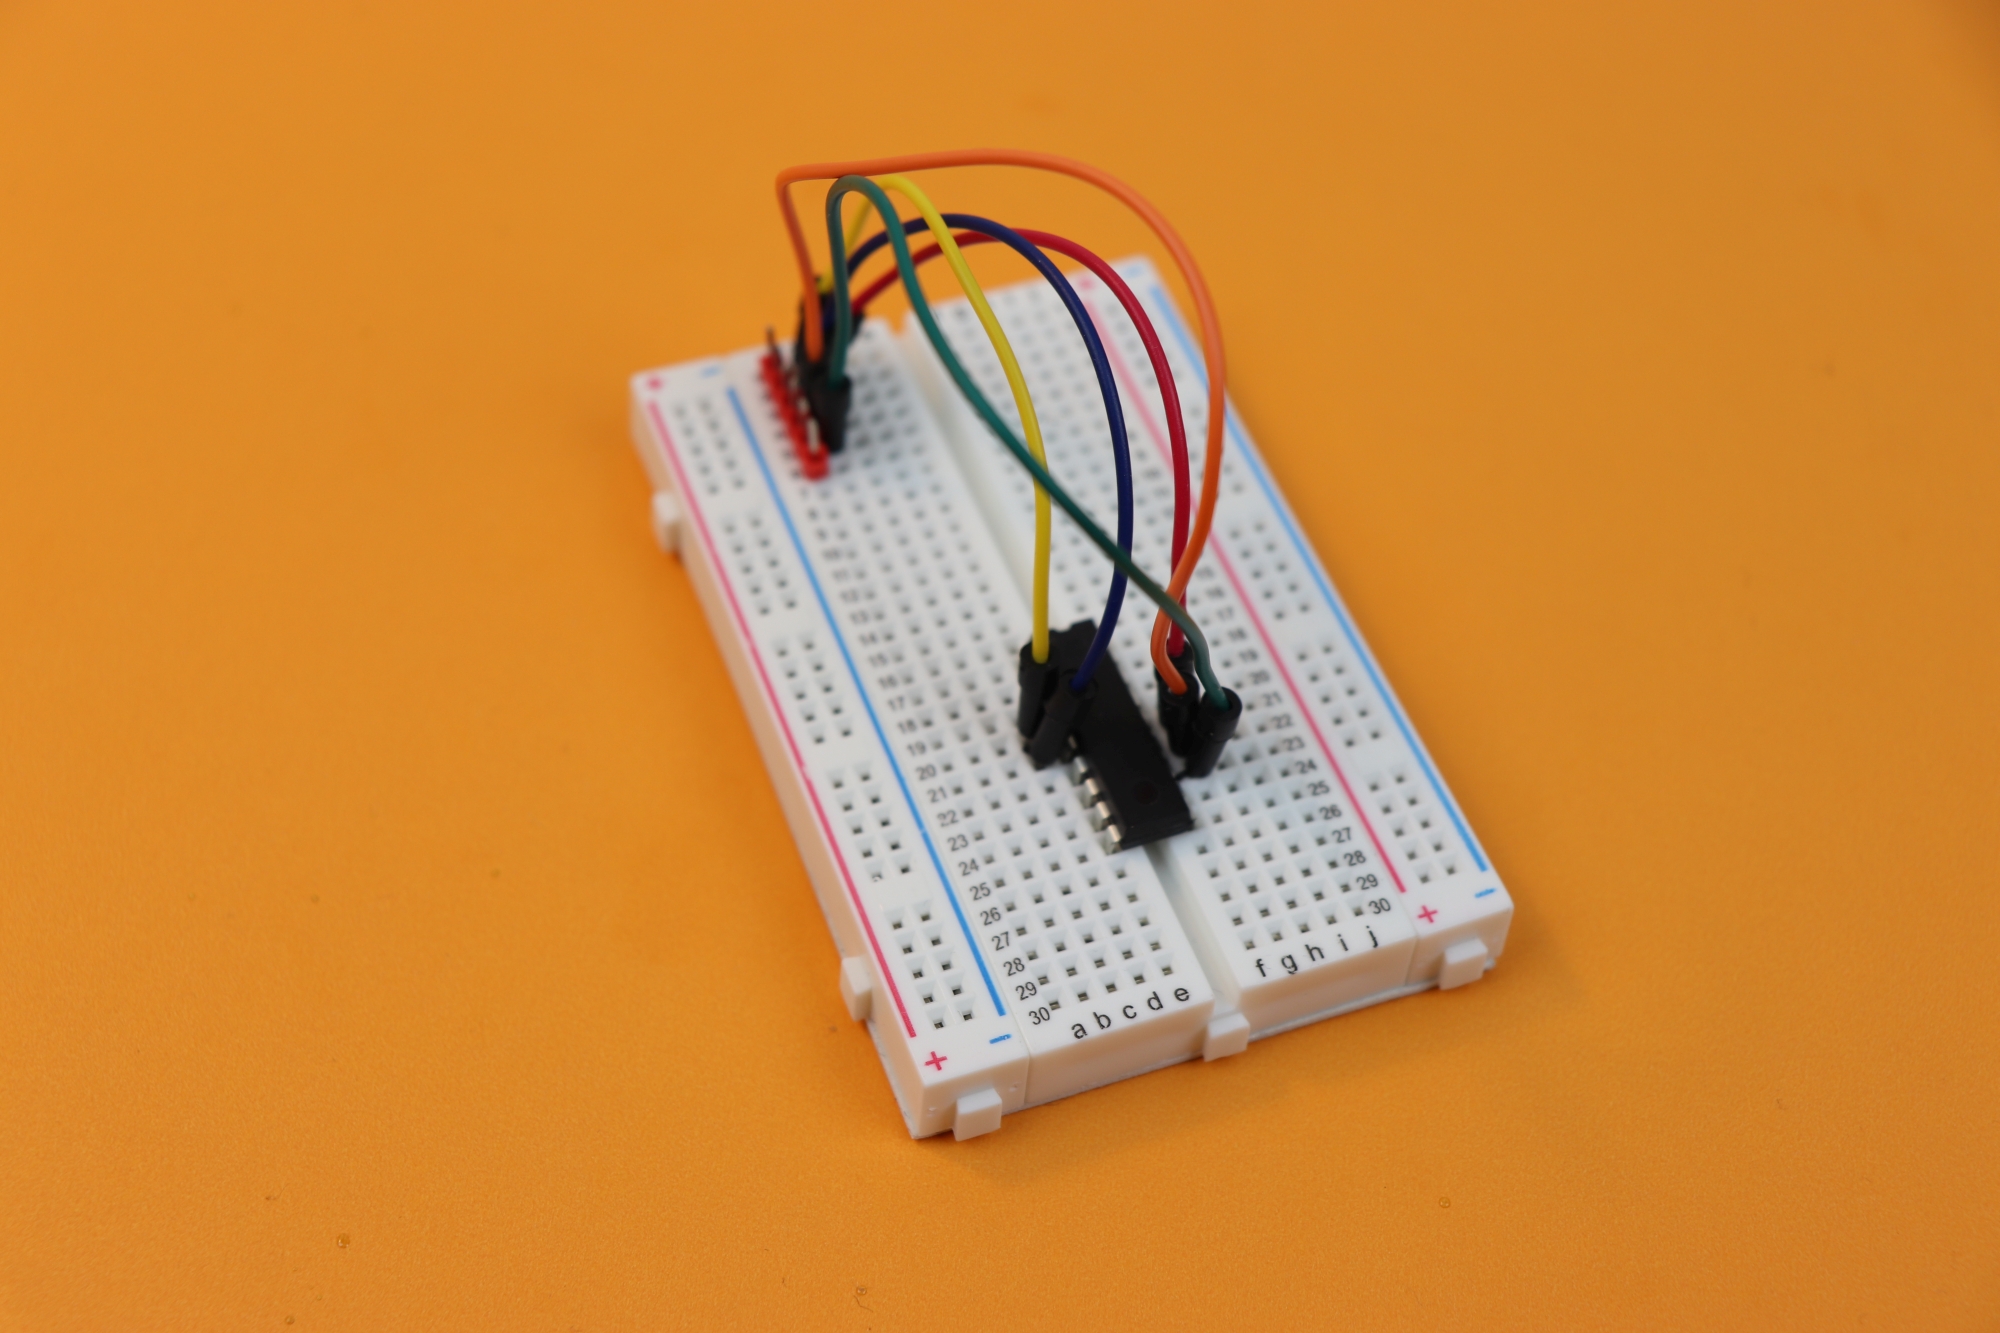
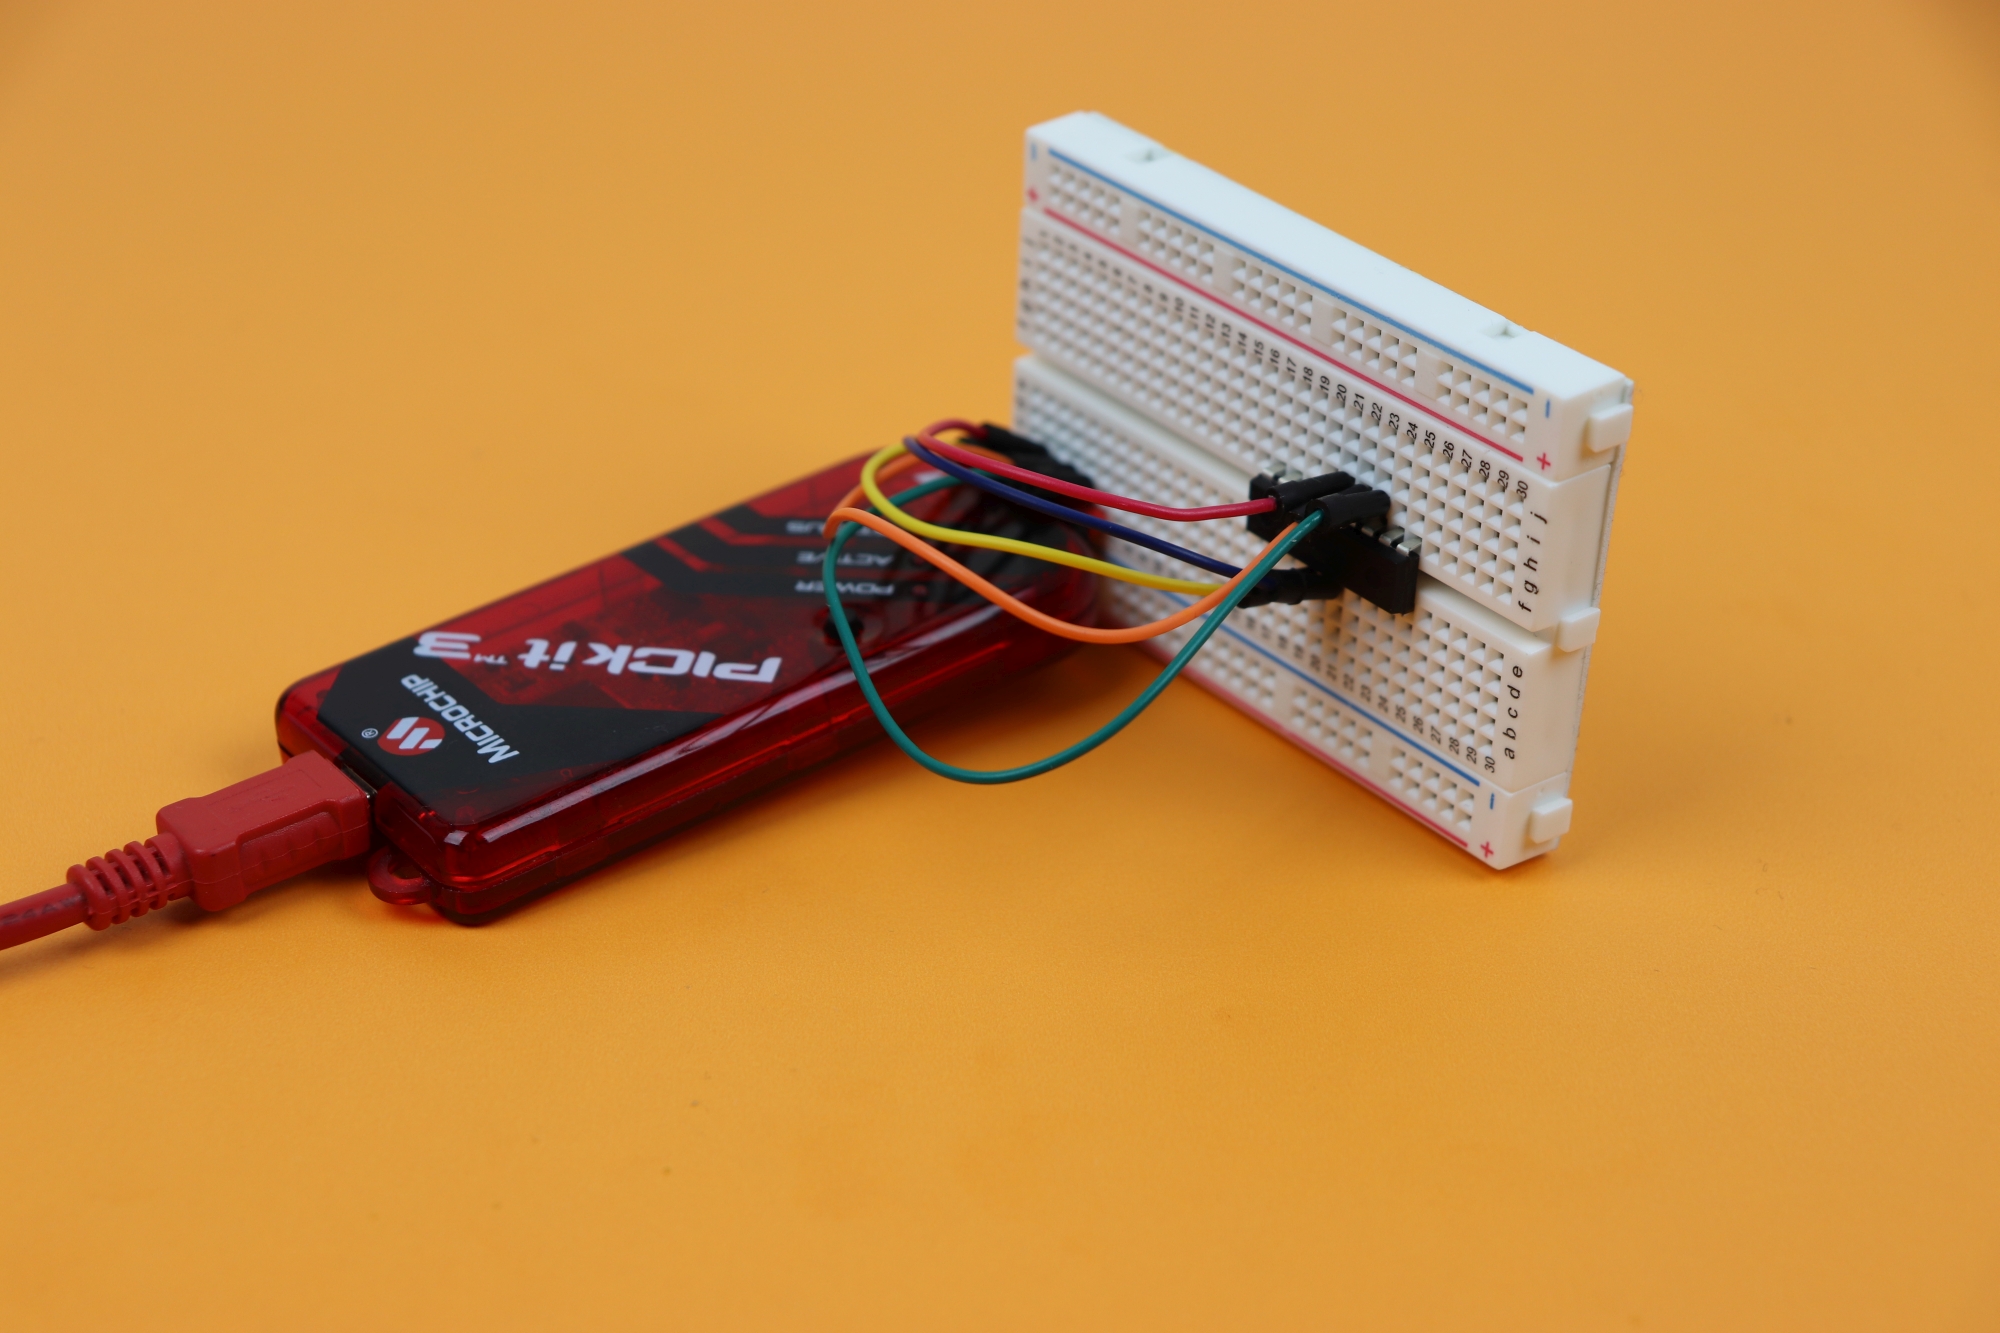
Then you can stick the PICkit3 into the circuit, and connect it to a computer. In my case I did not really have a 45 degree pin header which is why I flipped the breadboard onto its side, but guess what, it works just fine :)
But how do you connect it to the PIC controller? That depends a lot on the specific controller you want to use. Each controller has designated programming pins (MCLR, PGD, and PGC) that need to be connected to the PICkit3. Let us pick the PIC16F627A as an example. In this picture below you can see the relevant pins:
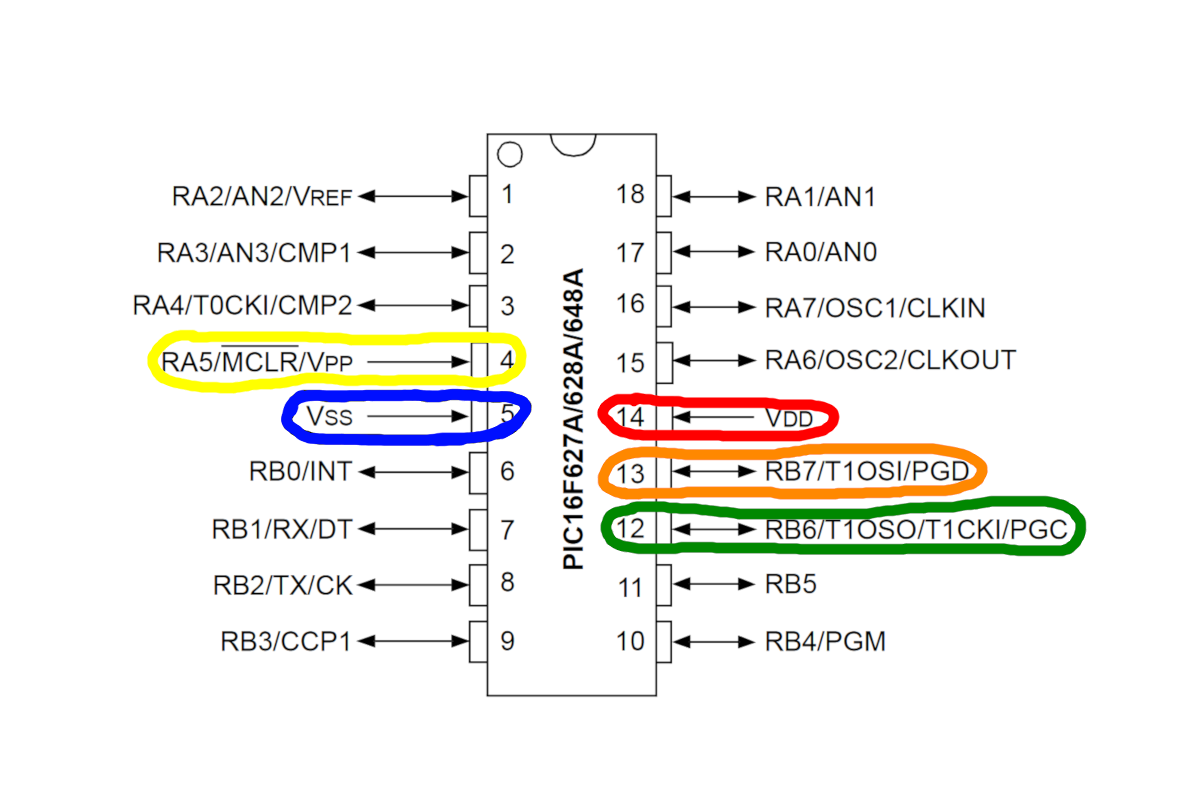
The colors correspond to the wires I used in the above pictures to connect the PIC to the PICkit3 on the breadboard. Give it a try :)
Step 4: Software stuff!
Now, finally, we need to download a free software by the company MicroChip. It is called MPLAB X IPE, which stands for Integrated Programming Environment 10. You can download it here for free. Yes, I know, it says MPLAB IDE instead of MPLAB IPE, but the IPE is included in this download.
Install the software and then run the MPLAB X IDE. it looks something like this:
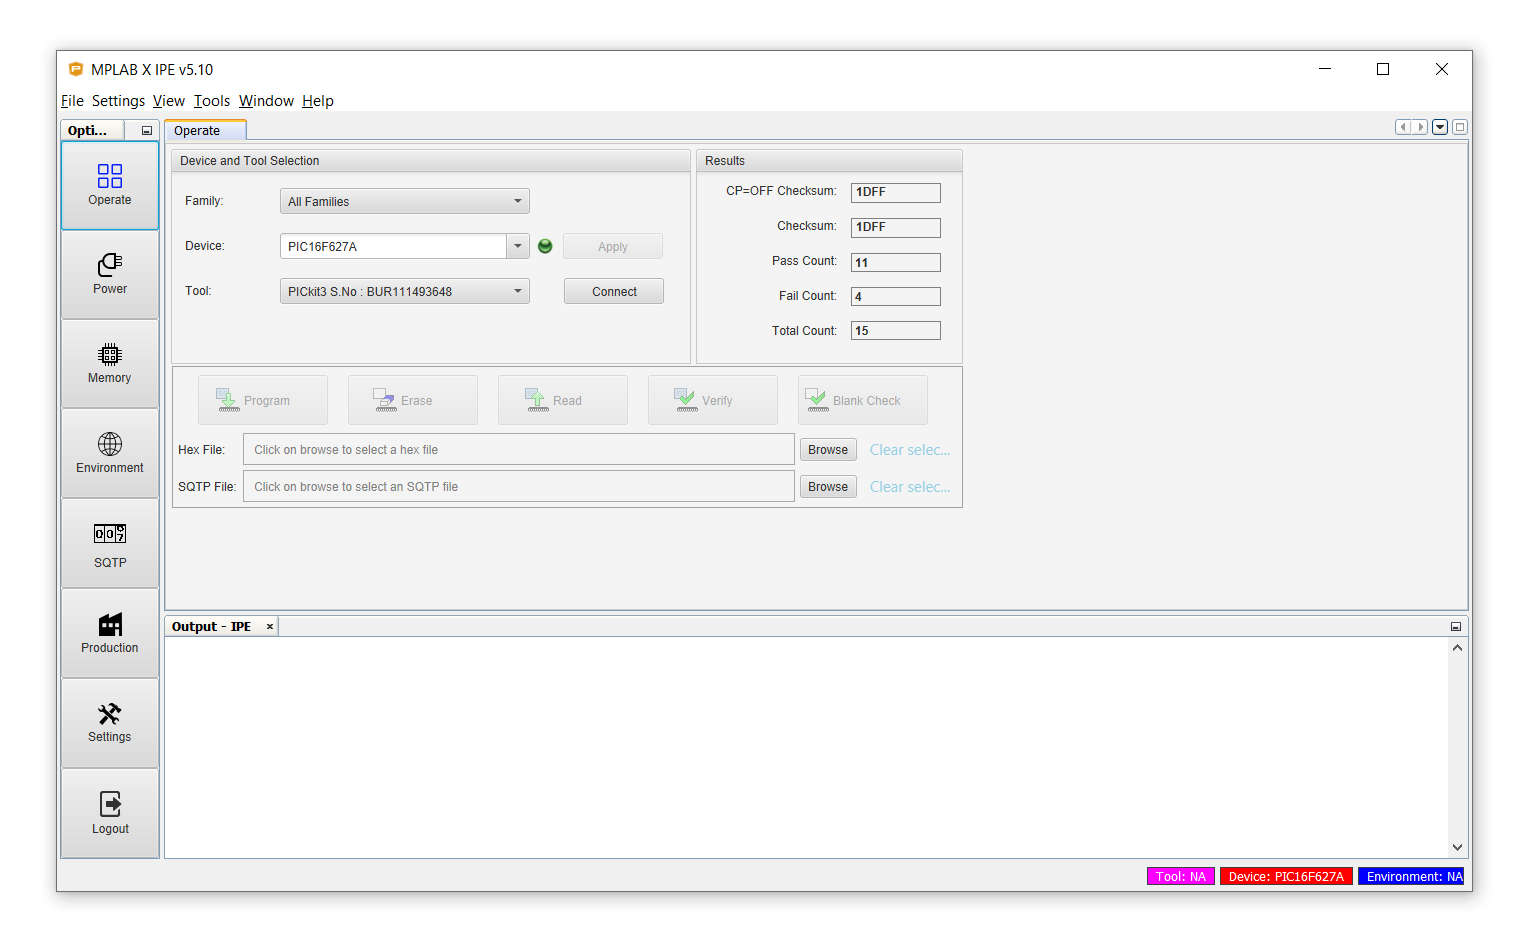
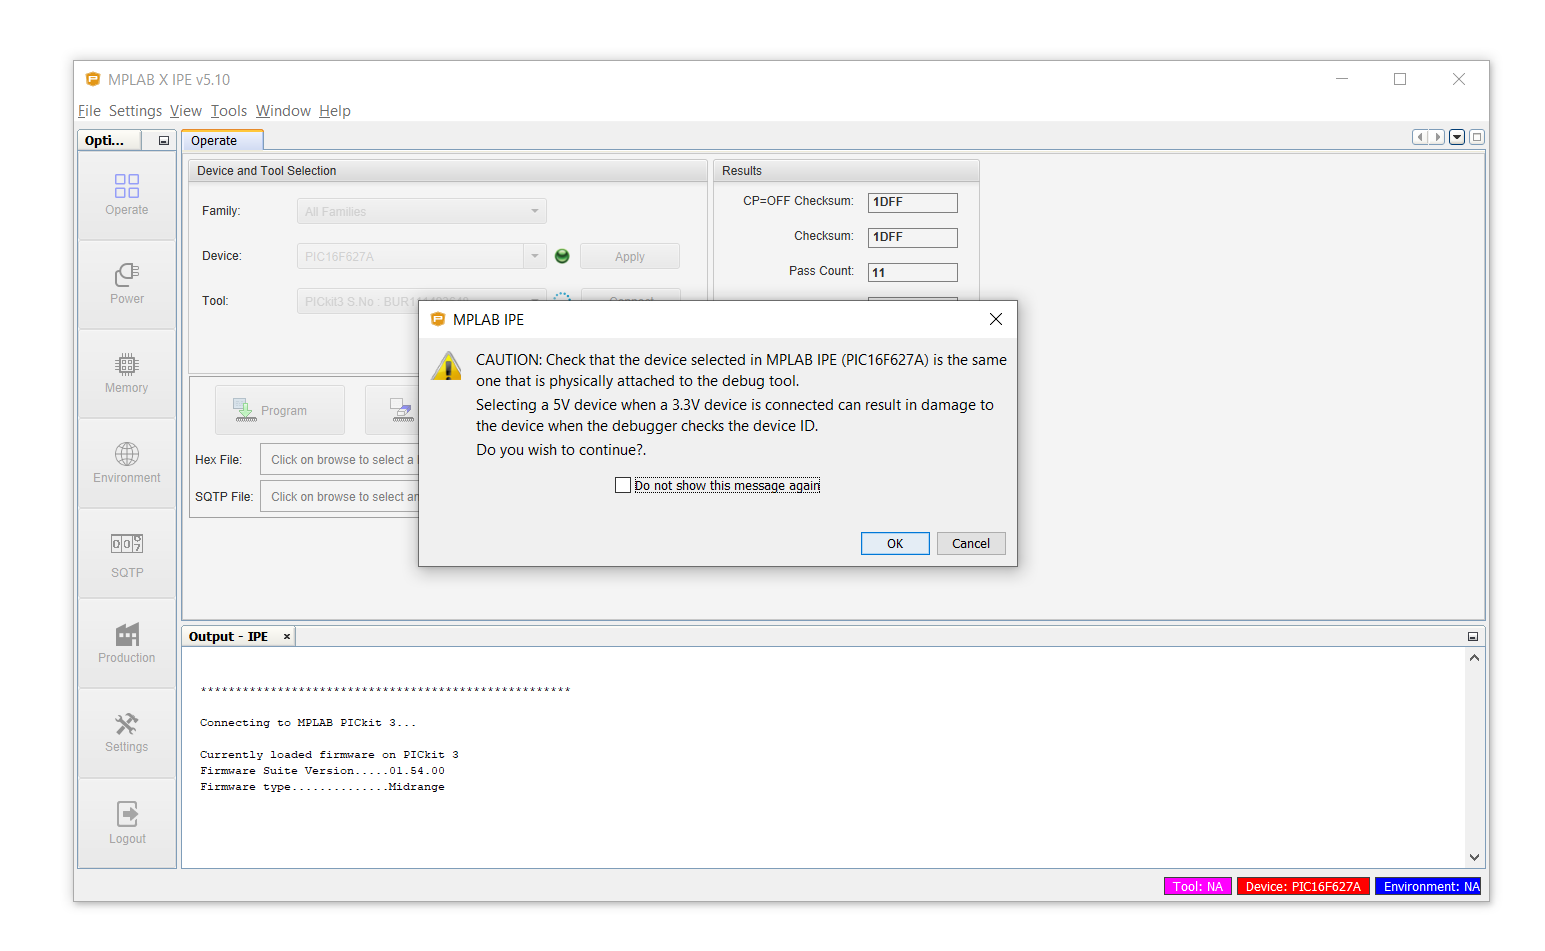
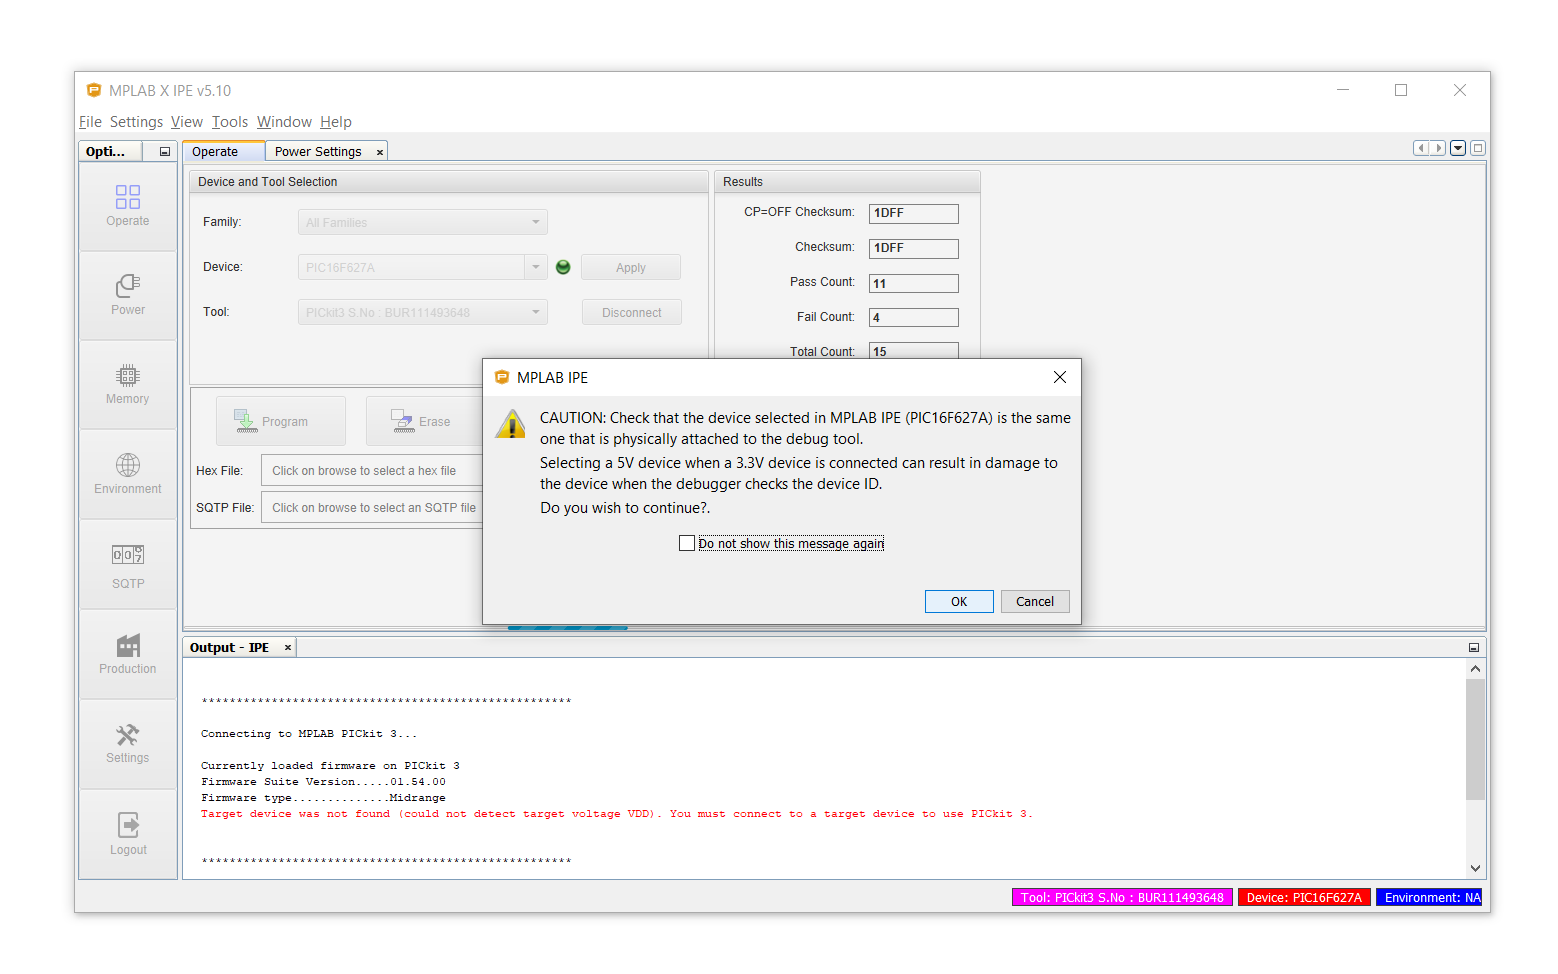
Make sure that under Device you select your controller. Under Tool you should already see the PICkit3 if it is plugged in. Go ahead and plug it in now if you haven't done it yet :) Then, click on Connect. Click OK on this message that appears:
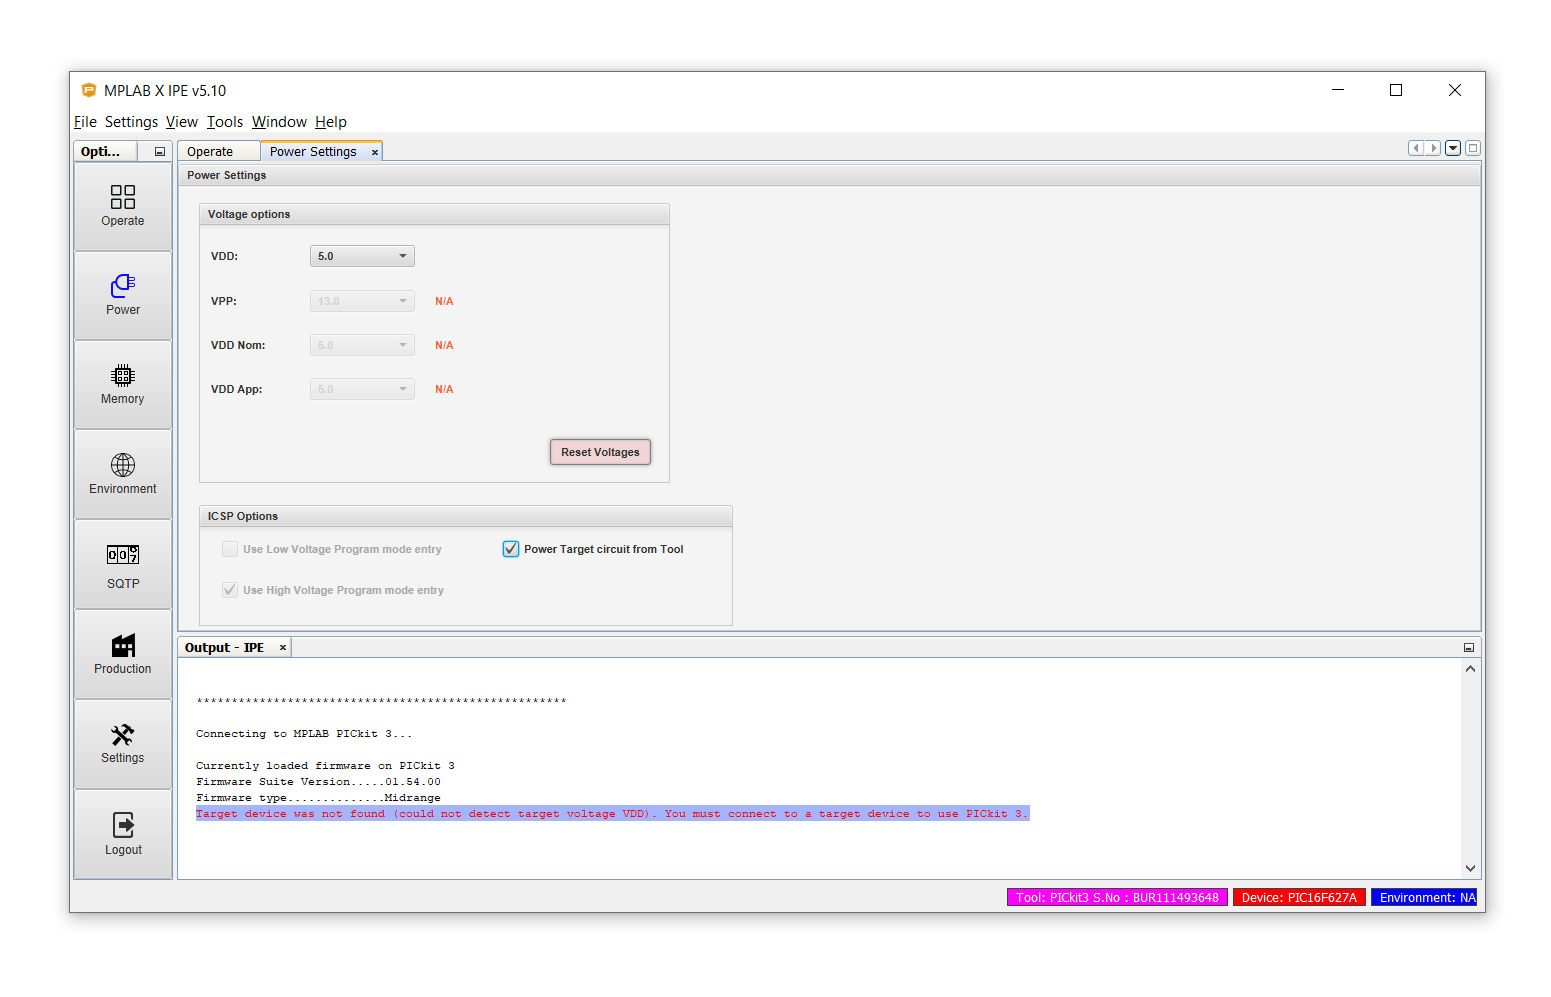
Perhaps you get an error message like this:
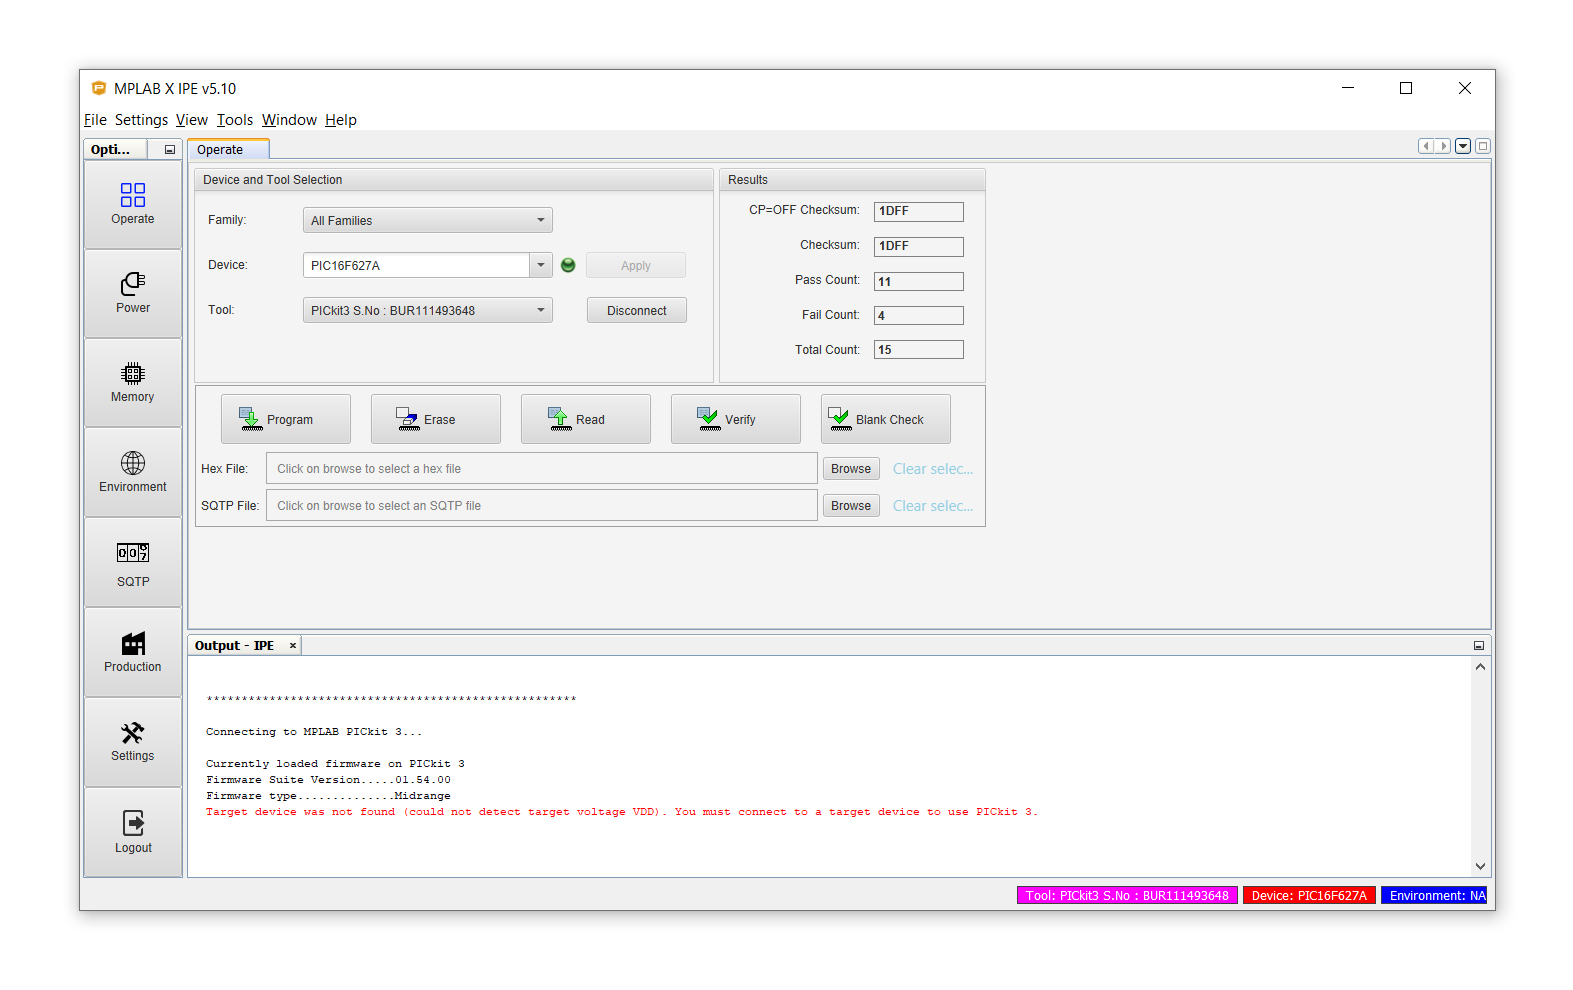 “Target device was not found (could not detect target voltage VDD). You must connect to a target device to use PICkit 3.”
If yes, then click on Power on the left-hand side, and check Power Target circuit from Tool. Make sure it is set to the correct voltage (5V for a 5V controller, 3.3V for a 3.3V controller):
Then, click back on Operate and click Connect for the second time. Maybe it already shows that it is connected, if not, just click Connect again. Now it should look like this:
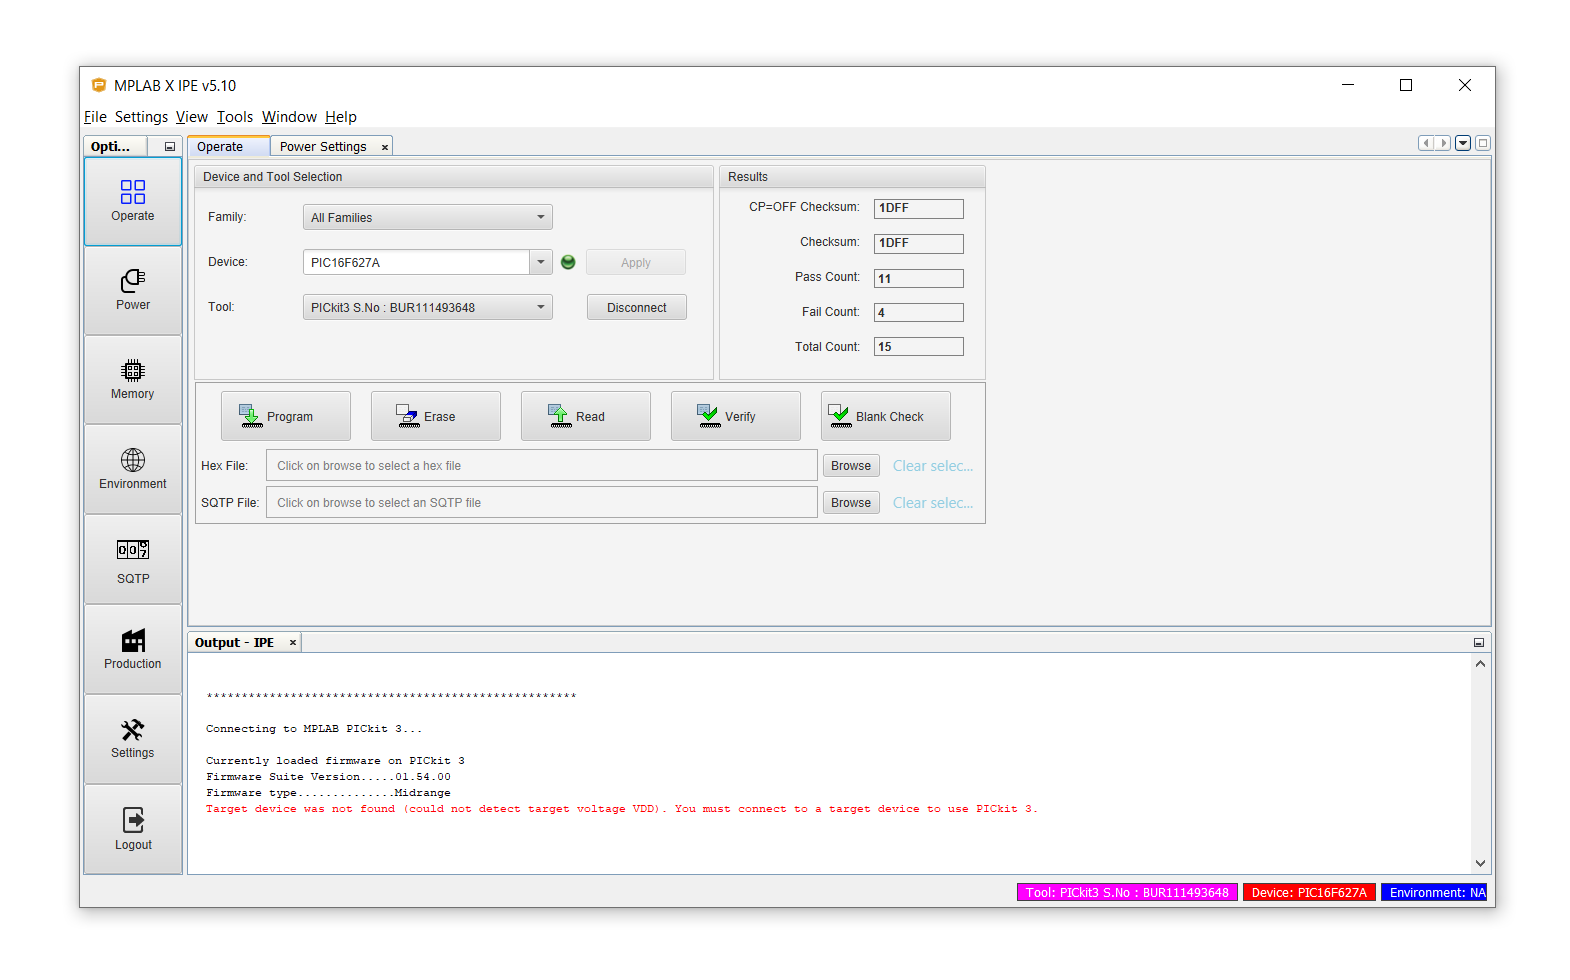
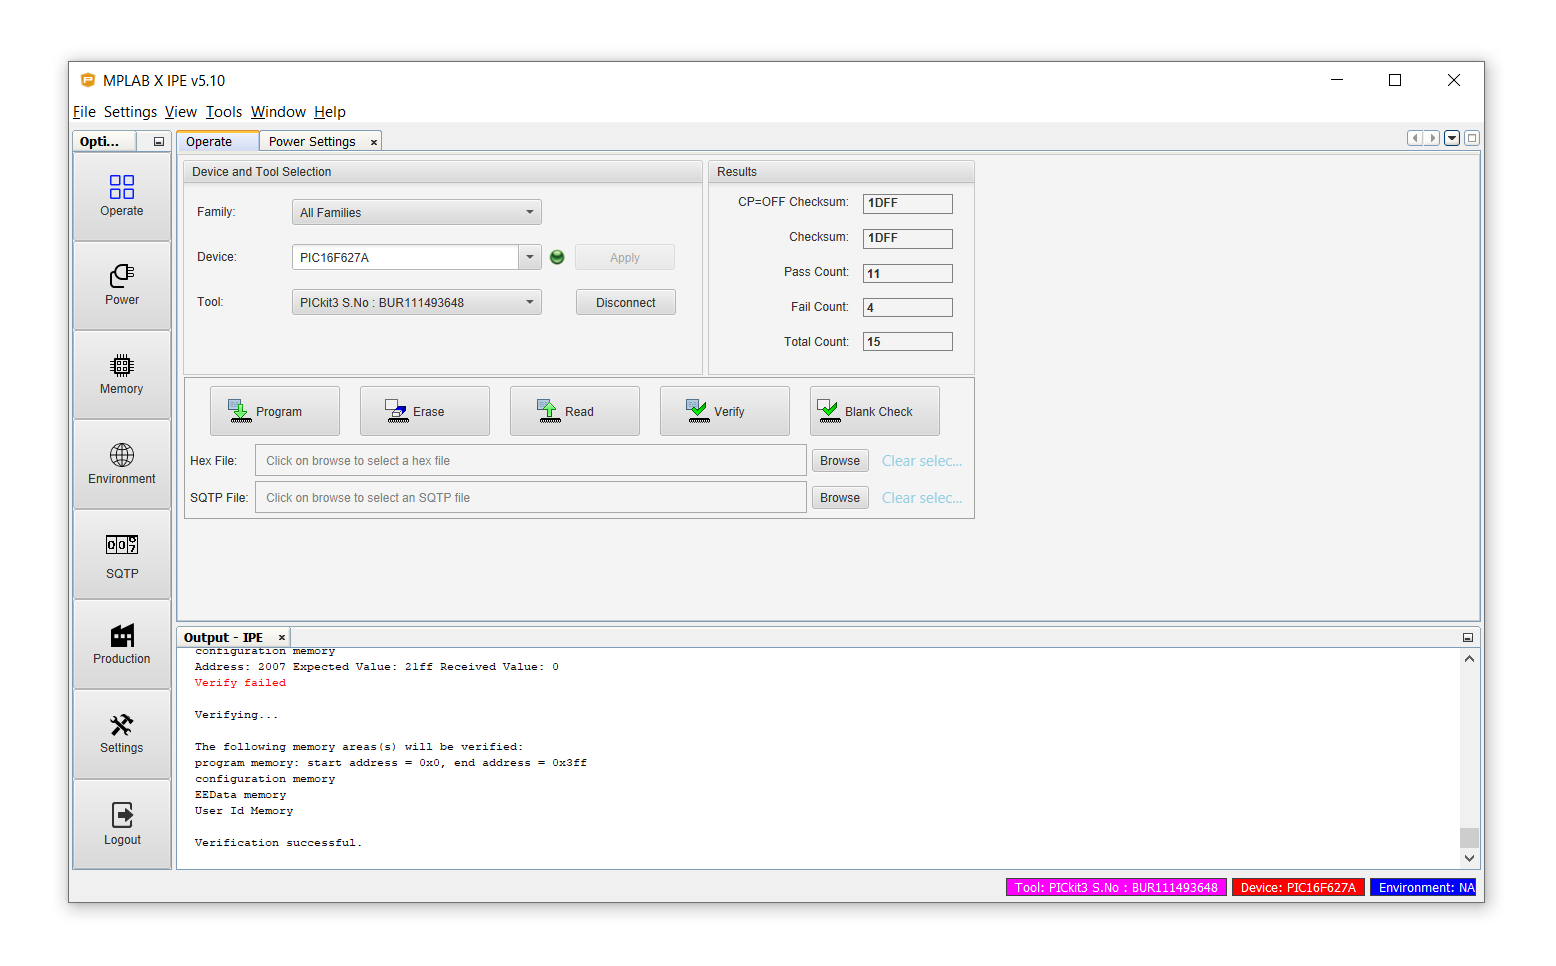
Click on Verify and click OK on this prompt:
Everything should work now, but you might get this error message:
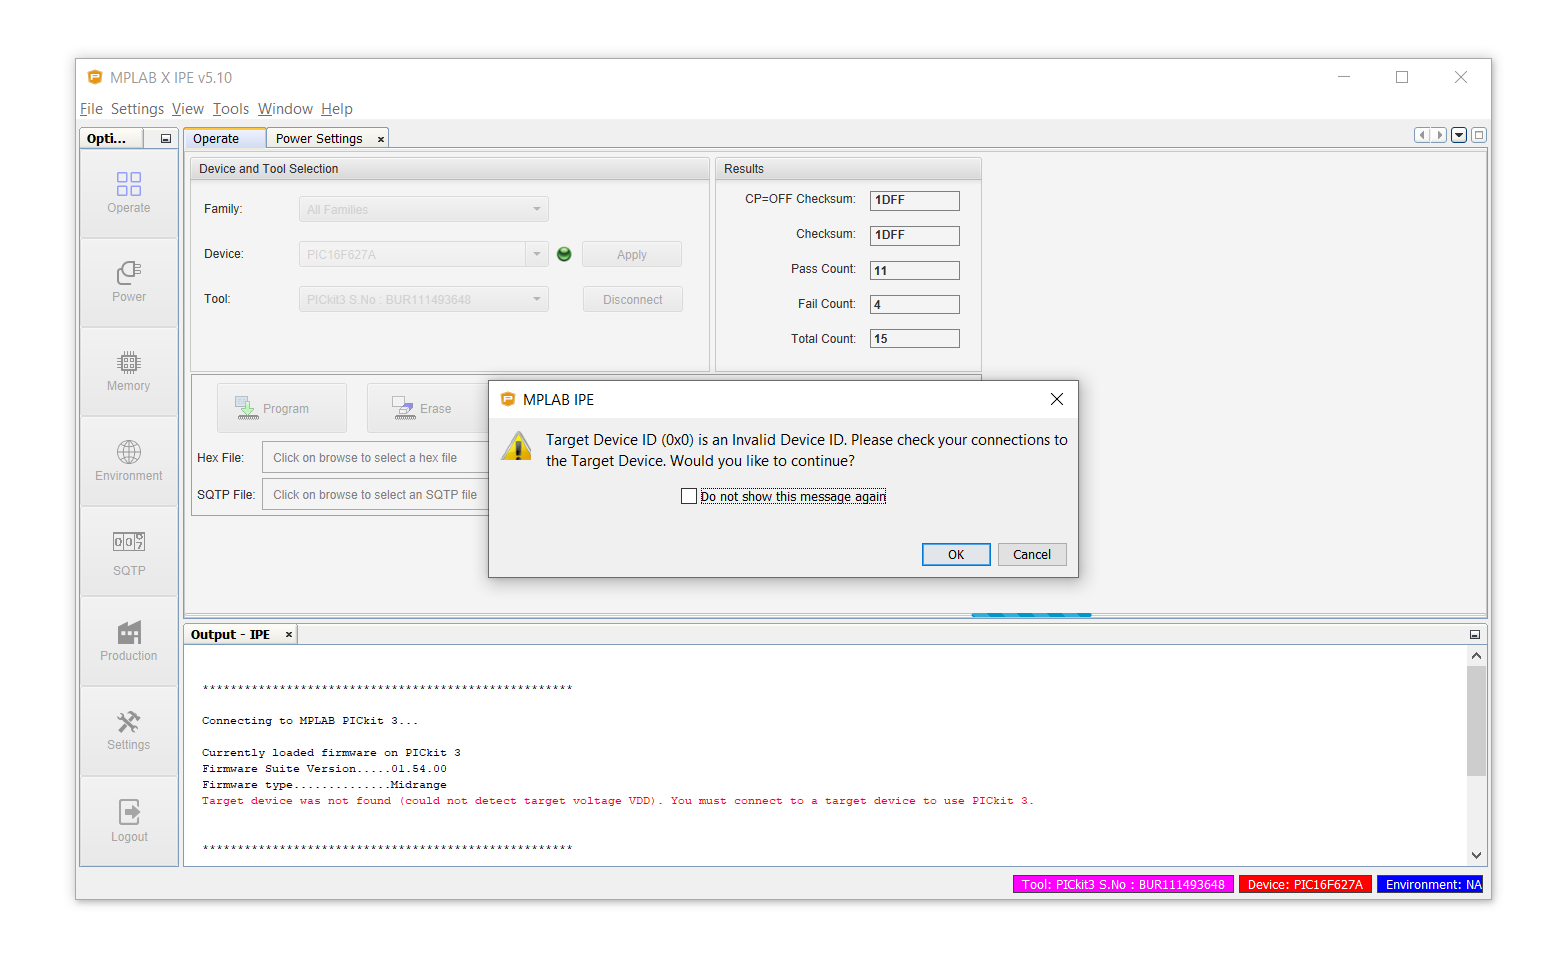 “Target Device ID (0x0) is an Invalid Device ID. Please check your connections to the Target Device. Would you like to continue?”
Check your connections! It might be that one of the cables is loose! After that all should be OK and you should see this message:
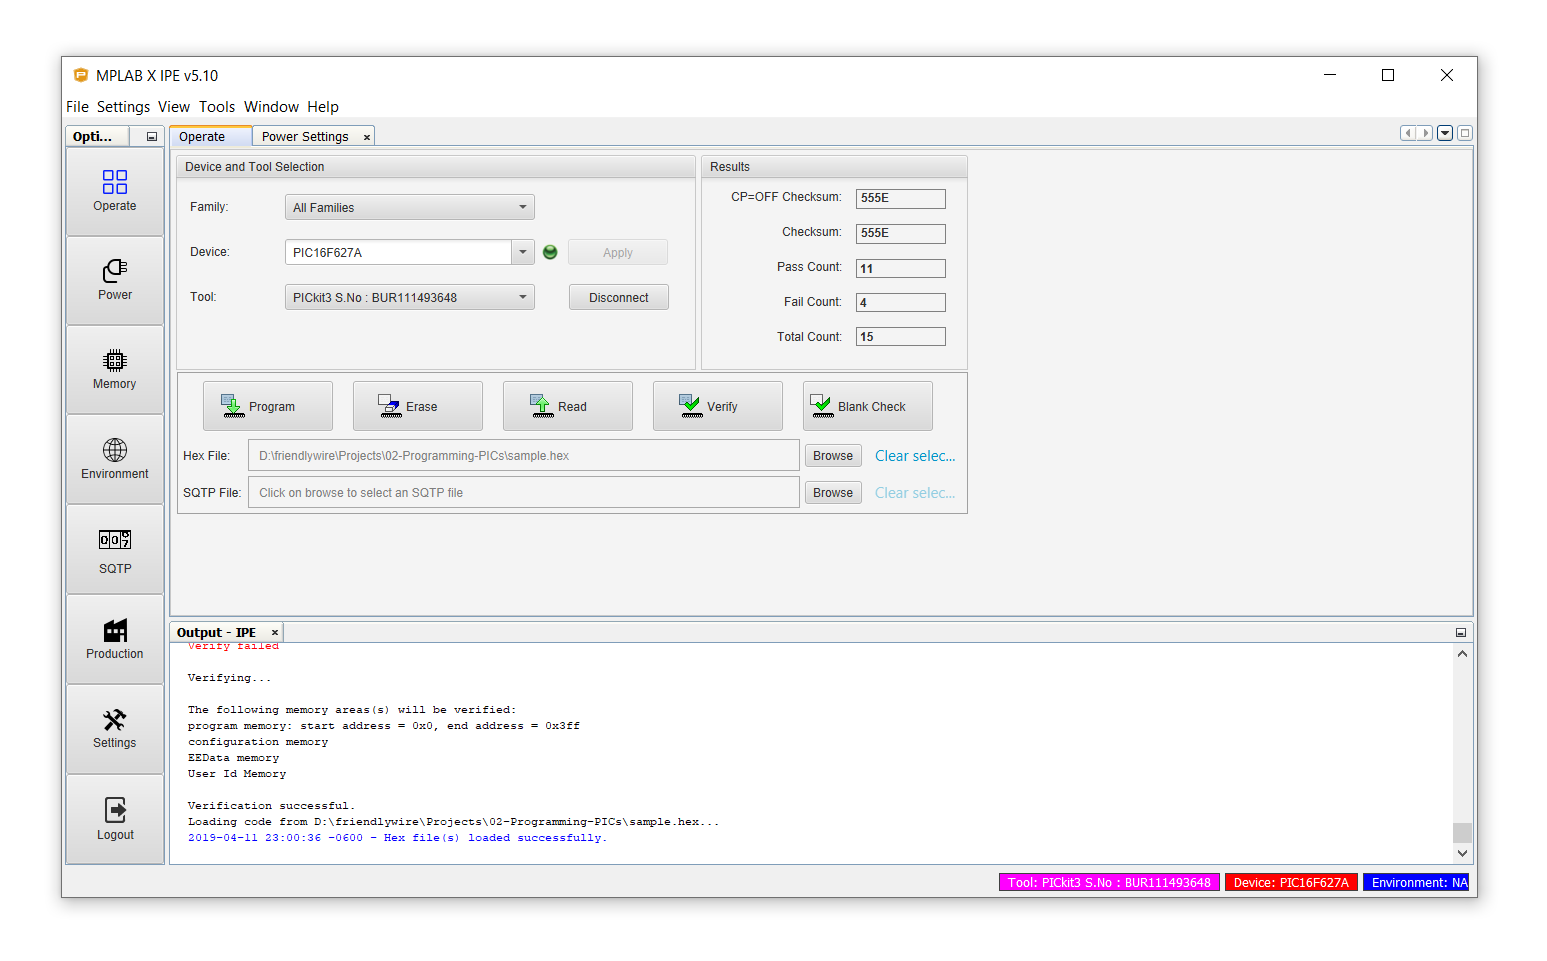
Alright! Now we are in business! It's time to load the .hex file! Click on File, then on Import, and then click on Hex to select your file, after which it should look like this:
Amazing! Now click on Program and watch the miracle ensue! This is what you will see:
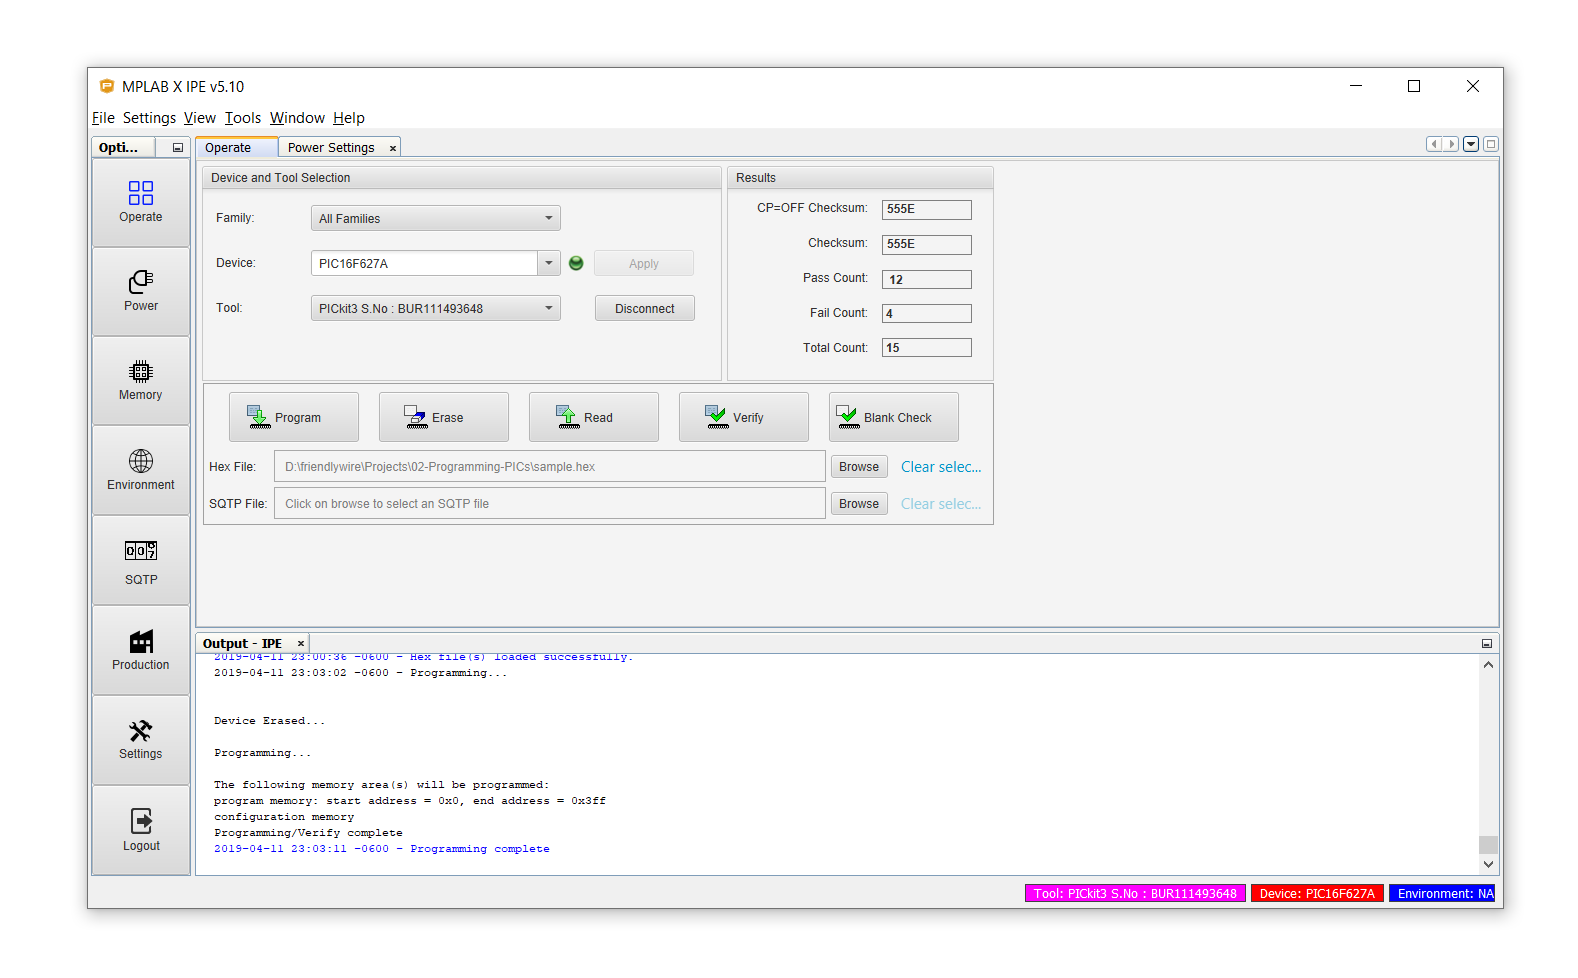
Programming complete! You did it! The hex file is now securely stored on your controller!
Finish line! You did it!
Now simply unplug the PICkit3, turn off the software, and unplug the controller from the breadbord. It is ready to be plugged into its final destination!
I hope this tutorial was helpful. If you feel like I missed a few parts here and there, or something is wrong or incorrect, please let me know in the comments below and I will try to add the missing information!
On a personal note: I know it can be frustrating to venture off into the unknown. But it can also be so rewarding. Learning how to flash microcontrollers is taking a first step into an entirely new world! What used to be unattainable is now within your reach :)


